Lucene评分算法解释
date
‣
slug
lucene
status
Published
tags
Tech
Elasticsearch
summary
Lucene 的 IndexSearcher 提供一个 explain 方法,能够解释 Document 的 Score 是怎么得来的,具体每一部分的得分都可以详细地打印出来
type
Post
是否完成
是否完成
主题
发布平台
状态
Lucene 的 IndexSearcher 提供一个 explain 方法,能够解释 Document 的 Score 是怎么得来的,具体每一部分的得分都可以详细地打印出来。这里用一个中文实例来纯手工验算一遍 Lucene 的评分算法,并且结合 Lucene 的源码做一个解释。
实际用例
首先是公司开发实际的用例,使用“湿疹”来检索多个字段。
{
  "from": 0,
  "size": 1,
  "query": {
    "bool": {
      "filter": [
        {
          "term": {
            "is_delete": {
              "value": false,
              "boost": 1
            }
          }
        },
        {
          "bool": {
            "should": [
              {
                "term": {
                  "item_type": {
                    "value": 1601,
                    "boost": 1
                  }
                }
              }
            ],
            "disable_coord": false,
            "adjust_pure_negative": true,
            "boost": 1
          }
        }
      ],
      "should": [
        {
          "term": {
            "title.keyword": {
              "value": "湿疹",
              "boost": 400
            }
          }
        },
        {
          "term": {
            "title_alias.keyword": {
              "value": "湿疹",
              "boost": 200
            }
          }
        },
        {
          "constant_score": {
            "filter": {
              "query_string": {
                "query": "title.ik_gram:湿疹",
                "fields": [],
                "use_dis_max": true,
                "tie_breaker": 0,
                "default_operator": "or",
                "auto_generate_phrase_queries": false,
                "max_determinized_states": 10000,
                "enable_position_increments": true,
                "fuzziness": "AUTO",
                "fuzzy_prefix_length": 0,
                "fuzzy_max_expansions": 50,
                "phrase_slop": 0,
                "escape": false,
                "split_on_whitespace": true,
                "boost": 1
              }
            },
            "boost": 100
          }
        },
        {
          "constant_score": {
            "filter": {
              "query_string": {
                "query": "title_alias.ik_gram:湿疹",
                "fields": [],
                "use_dis_max": true,
                "tie_breaker": 0,
                "default_operator": "or",
                "auto_generate_phrase_queries": false,
                "max_determinized_states": 10000,
                "enable_position_increments": true,
                "fuzziness": "AUTO",
                "fuzzy_prefix_length": 0,
                "fuzzy_max_expansions": 50,
                "phrase_slop": 0,
                "escape": false,
                "split_on_whitespace": true,
                "boost": 1
              }
            },
            "boost": 50
          }
        },
        {
          "constant_score": {
            "filter": {
              "query_string": {
                "query": "title_sub_title:湿疹",
                "fields": [],
                "use_dis_max": true,
                "tie_breaker": 0,
                "default_operator": "or",
                "auto_generate_phrase_queries": false,
                "max_determinized_states": 10000,
                "enable_position_increments": true,
                "fuzziness": "AUTO",
                "fuzzy_prefix_length": 0,
                "fuzzy_max_expansions": 50,
                "phrase_slop": 0,
                "escape": false,
                "split_on_whitespace": true,
                "boost": 1
              }
            },
            "boost": 50
          }
        },
        {
          "constant_score": {
            "filter": {
              "query_string": {
                "query": "alias_sub_title:湿疹",
                "fields": [],
                "use_dis_max": true,
                "tie_breaker": 0,
                "default_operator": "or",
                "auto_generate_phrase_queries": false,
                "max_determinized_states": 10000,
                "enable_position_increments": true,
                "fuzziness": "AUTO",
                "fuzzy_prefix_length": 0,
                "fuzzy_max_expansions": 50,
                "phrase_slop": 0,
                "escape": false,
                "split_on_whitespace": true,
                "boost": 1
              }
            },
            "boost": 50
          }
        },
        {
          "query_string": {
            "query": "explain_introduce_exists:1",
            "fields": [],
            "use_dis_max": true,
            "tie_breaker": 0,
            "default_operator": "or",
            "auto_generate_phrase_queries": false,
            "max_determinized_states": 10000,
            "enable_position_increments": true,
            "fuzziness": "AUTO",
            "fuzzy_prefix_length": 0,
            "fuzzy_max_expansions": 50,
            "phrase_slop": 0,
            "escape": false,
            "split_on_whitespace": true,
            "boost": 0.8
          }
        },
        {
          "query_string": {
            "query": "-explain_introduce_exists:1",
            "fields": [],
            "use_dis_max": true,
            "tie_breaker": 0,
            "default_operator": "or",
            "auto_generate_phrase_queries": false,
            "max_determinized_states": 10000,
            "enable_position_increments": true,
            "fuzziness": "AUTO",
            "fuzzy_prefix_length": 0,
            "fuzzy_max_expansions": 50,
            "phrase_slop": 0,
            "escape": false,
            "split_on_whitespace": true,
            "boost": 0.5
          }
        }
      ],
      "disable_coord": false,
      "adjust_pure_negative": true,
      "boost": 1
    }
  },
  "min_score": 1,
  "explain": true
}
完整的输出不展示了,截取_explanation 解释字段,逐一分析各项的得分是怎么计算的。
{
    "value": 500.8,
    "description": "sum of:",
    "details": [
        {
            "value": 400,
            "description": "weight(title.keyword:湿疹 in 1490) [PerFieldSimilarity], result of:",
            "details": [
                {
                    "value": 400,
                    "description": "score(doc=1490,freq=1.0), product of:",
                    "details": [
                        {
                            "value": 400,
                            "description": "queryWeight, product of:",
                            "details": [
                                {
                                    "value": 400,
                                    "description": "boost",
                                    "details": []
                                },
                                {
                                    "value": 1,
                                    "description": "idf, computed as log((docCount+1)/(docFreq+1)) + 1 from:",
                                    "details": [
                                        {
                                            "value": 3,
                                            "description": "docFreq",
                                            "details": []
                                        },
                                        {
                                            "value": 1491,
                                            "description": "docCount",
                                            "details": []
                                        }
                                    ]
                                },
                                {
                                    "value": 1,
                                    "description": "queryNorm",
                                    "details": []
                                }
                            ]
                        },
                        {
                            "value": 1,
                            "description": "fieldWeight in 1490, product of:",
                            "details": [
                                {
                                    "value": 1,
                                    "description": "tf(freq=1.0), with freq of:",
                                    "details": [
                                        {
                                            "value": 1,
                                            "description": "termFreq=1.0",
                                            "details": []
                                        }
                                    ]
                                },
                                {
                                    "value": 1,
                                    "description": "idf, computed as log((docCount+1)/(docFreq+1)) + 1 from:",
                                    "details": [
                                        {
                                            "value": 3,
                                            "description": "docFreq",
                                            "details": []
                                        },
                                        {
                                            "value": 1491,
                                            "description": "docCount",
                                            "details": []
                                        }
                                    ]
                                },
                                {
                                    "value": 1,
                                    "description": "fieldNorm(doc=1490)",
                                    "details": []
                                }
                            ]
                        }
                    ]
                }
            ]
        },
        {
            "value": 100,
            "description": "ConstantScore(title.ik_gram:湿疹), product of:",
            "details": [
                {
                    "value": 100,
                    "description": "boost",
                    "details": []
                },
                {
                    "value": 1,
                    "description": "queryNorm",
                    "details": []
                }
            ]
        },
        {
            "value": 0.8,
            "description": "explain_introduce_exists:[1 TO 1], product of:",
            "details": [
                {
                    "value": 0.8,
                    "description": "boost",
                    "details": []
                },
                {
                    "value": 1,
                    "description": "queryNorm",
                    "details": []
                }
            ]
        },
        {
            "value": 0,
            "description": "match on required clause, product of:",
            "details": [
                {
                    "value": 0,
                    "description": "# clause",
                    "details": []
                },
                {
                    "value": 1,
                    "description": "is_delete:F, product of:",
                    "details": [
                        {
                            "value": 1,
                            "description": "boost",
                            "details": []
                        },
                        {
                            "value": 1,
                            "description": "queryNorm",
                            "details": []
                        }
                    ]
                }
            ]
        },
        {
            "value": 0,
            "description": "match on required clause, product of:",
            "details": [
                {
                    "value": 0,
                    "description": "# clause",
                    "details": []
                },
                {
                    "value": 1,
                    "description": "item_type:[1601 TO 1601], product of:",
                    "details": [
                        {
                            "value": 1,
                            "description": "boost",
                            "details": []
                        },
                        {
                            "value": 1,
                            "description": "queryNorm",
                            "details": []
                        }
                    ]
                }
            ]
        }
    ]
}
Lucene 的评分计算公式
来看看 Lucene 的评分计算公式:

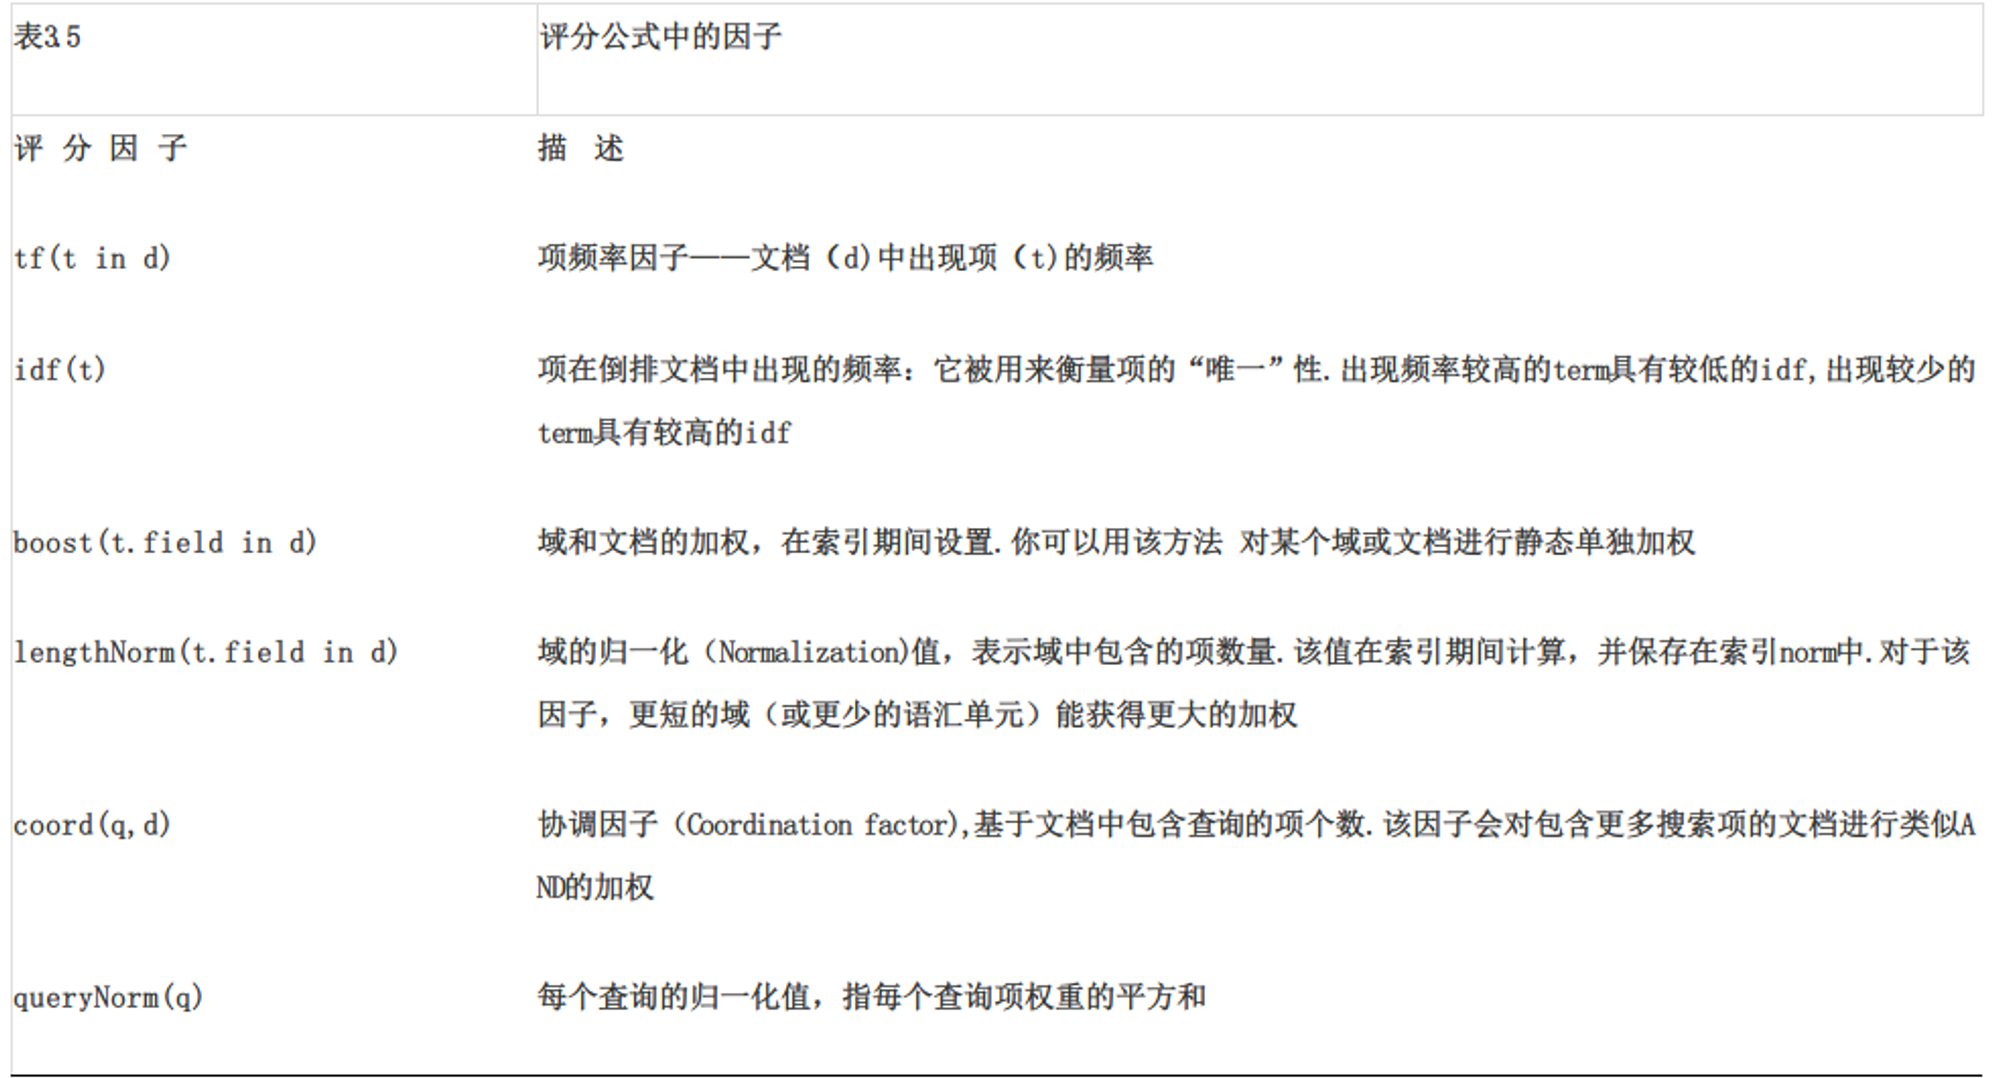
分值计算方式为查询语句 q 中每个项 t 与文档 d 的匹配分值之和,当然还有权重的因素。其中每一项的意思如下表所示:
总匹配分值的计算
具体到上面的测试来讲,最终匹配分值=查询语句在多个字段中的得分之和。即最终结果:500.8=400+100+0.8
- 400:title.keyword
- 100:constant_score 中的 title.ik_gram
- 0.8:explain_introduce_exists 存在
查询语句在某个域匹配分值计算
具体分析每个字段下的得分是怎么计算的。以 title.keyword 的得分 400 为例,搜索词为:“湿疹”。所以计算结果等于这两部分的和:“湿疹”在 title 中的匹配分值 。即查询设置的 boost=400。
某个项在某个域的匹配分值的计算
第一部分:should
其中包括 3 个部分:
- title 和 title_alias 的 term 精准匹配
- title.ik_gram、title_alias.ik_gram、title_sub_title、alias_sub_title 的 constant_score 查询
- explain_introduce_exists 的 query_string 查询
term 精准匹配
接下来我们看看“湿疹”在 title.keyword 中的匹配分值 400 是怎么算出来的。这里的查询是精准匹配且 title 不进行分词,只有一个项:“湿疹”。在 field 中的分值 score = 查询权重 queryWeight x 域权重 fieldWeight,即 400 =400 * 1。
我们可以看下源码:
private Explanation explainScore(int doc, Explanation freq, IDFStats stats, NumericDocValues norms) {
  Explanation queryExpl = explainQuery(stats);
  Explanation fieldExpl = explainField(doc, freq, stats, norms);
  if (queryExpl.getValue() == 1f) {
    return fieldExpl;
  }
  return Explanation.match(
      queryExpl.getValue() * fieldExpl.getValue(),
      "score(doc="+doc+",freq="+freq.getValue()+"), product of:",
      queryExpl, fieldExpl);
}
最后的匹配的得分= queryExpl.getValue() * fieldExpl.getValue(),
queryWeight 的计算
queryWeight 的计算可以在 TermQuery$TermWeight.normalize(float)方法中看到计算的实现:
private Explanation explainQuery(IDFStats stats) {
  List subs = new ArrayList<>();

  Explanation boostExpl = Explanation.match(stats.boost, "boost");
  if (stats.boost != 1.0f)
    subs.add(boostExpl);
  subs.add(stats.idf);

  Explanation queryNormExpl = Explanation.match(stats.queryNorm,"queryNorm");
  subs.add(queryNormExpl);

  return Explanation.match(
      boostExpl.getValue() * stats.idf.getValue() * queryNormExpl.getValue(),
      "queryWeight, product of:", subs);
}


@Override
  public void normalize(float queryNorm, float boost) {
    this.boost = boost;
    this.queryNorm = queryNorm;
    queryWeight = queryNorm * boost * idf.getValue();
    value = queryWeight * idf.getValue();         // idf for document
  }
}
queryWeight = queryNorm _ boost _ idf.getValue(),这里设置 boost = 400。即 400 = 400 _ 1 _ 1。
idf 的计算
idf 是项在倒排文档中出现的频率,计算方式为
public float idf(long docFreq, long docCount) {
    return (float)(Math.log((double)(docCount + 1L) / (double)(docFreq + 1L)) + 1.0D);
}
docFreq 是根据指定关键字进行检索,检索到的 Document 的数量,我们测试的 docFreq=3;docCount 是指索引文件中总共的 Document 的数量,例子的 numDocs=1491(这里实际上是分片的文档数,实际中为了规避不同分片的影响,设置 idf=1)。但实际上我们自定义了相似度计算插件,设置 idf=1。
@Override
public float idf(long l, long l1) {
    return 1f;
}
queryNorm 的计算
queryNorm 的计算在 DefaultSimilarity 类中实现,如下所示:
@Override
public float queryNorm(float sumOfSquaredWeights) {
  return (float)(1.0 / Math.sqrt(sumOfSquaredWeights));
}
这里,sumOfSquaredWeights 的计算是在 org.apache.lucene.search.TermQuery.TermWeight 类中的 sumOfSquaredWeights 方法实现:
/**
 * Creates a normalized weight for a top-level {@link Query}.
 * The query is rewritten by this method and {@link Query#createWeight} called,
 * afterwards the {@link Weight} is normalized. The returned {@code Weight}
 * can then directly be used to get a {@link Scorer}.
 * @lucene.internal
 */
public Weight createNormalizedWeight(Query query, boolean needsScores) throws IOException {
  query = rewrite(query);
  Weight weight = createWeight(query, needsScores);
  float v = weight.getValueForNormalization();
  float norm = getSimilarity(needsScores).queryNorm(v);
  if (Float.isInfinite(norm) || Float.isNaN(norm)) {
    norm = 1.0f;
  }
  weight.normalize(norm, 1.0f);
  return weight;
}

sumOfSquaredWeights=weight.getValueForNormalization()


@Override
public float getValueForNormalization() {
  // TODO: (sorta LUCENE-1907) make non-static class and expose this squaring via a nice method to subclasses?
  return queryWeight * queryWeight;  // sum of squared weights
}
其实默认情况下,sumOfSquaredWeights = idf x idf,因为 Lucune 中默认的 boost = 1.0。
上面测试例子中 sumOfSquaredWeights 的计算如下所示:
sumOfSquaredWeights = 400 x 400;
然后,就可以计算 queryNorm 的值了,计算如下所示:
queryNorm = (float)(1.0 / Math.sqrt(400 x 400) = 0.0025
实际我们也自定义了 queryNorm,直接输出 1。
@Override
public float queryNorm(float valueForNormalization) {
    return 1.0F;
}
fieldWeight 的计算
在 org/apache/lucene/search/similarities/TFIDFSimilarity.java 的 explainScore 方法中有:
private Explanation explainField(int doc, Explanation freq, IDFStats stats, NumericDocValues norms) {
  Explanation tfExplanation = Explanation.match(tf(freq.getValue()), "tf(freq="+freq.getValue()+"), with freq of:", freq);
  Explanation fieldNormExpl = Explanation.match(
      norms != null ? decodeNormValue(norms.get(doc)) : 1.0f,
      "fieldNorm(doc=" + doc + ")");

  return Explanation.match(
      tfExplanation.getValue() * stats.idf.getValue() * fieldNormExpl.getValue(),
      "fieldWeight in " + doc + ", product of:",
      tfExplanation, stats.idf, fieldNormExpl);
}
使用计算式表示就是
fieldWeight = tf _ idf _ fieldNorm=1 _ 1_ 1
tf 的计算
文档中项的出现概率,计算方式为:
/** Implemented as sqrt(freq). */
@Override
public float tf(float freq) {
  return (float)Math.sqrt(freq);
}
同样,我们也进行了自定义:
@Override
public float tf(float v) {
    return 1f;
}
fieldNorm 的计算
tf 和 idf 的计算参考前面的,fieldNorm 的计算在索引的时候确定了,此时直接从索引文件中读取,这个方法并没有给出直接的计算。如果使用 ClassicSimilarity 的话,它实际上就是 lengthNorm,域越长的话 Norm 越小。在源码中藏得比较深一些,在 MemoryIndex 的 getNormValues 方法
public NumericDocValues getNormValues(String field) {
    MemoryIndex.Info info = (MemoryIndex.Info)MemoryIndex.this.fields.get(field);
    return info != null && !info.fieldInfo.omitsNorms() ? info.getNormDocValues() : null;
}
其内部类 Info 中有 MemoryIndex.this.normSimilarity.computeNorm(invertState),TFIDFSimilarity 就有对应的实现方法
NumericDocValues getNormDocValues() {
    if (this.norms == null) {
        FieldInvertState invertState = new FieldInvertState(this.fieldInfo.name, this.fieldInfo.number, this.numTokens, this.numOverlapTokens, 0, this.boost);
        final long value = MemoryIndex.this.normSimilarity.computeNorm(invertState);
        this.norms = new NumericDocValues() {
            public long get(int docID) {
                if (docID != 0) {
                    throw new IndexOutOfBoundsException();
                } else {
                    return value;
                }
            }
        };
    }

    return this.norms;
}
TFIDFSimilarity 实现方法其计算为:
public abstract float lengthNorm(FieldInvertState state);

@Override
public final long computeNorm(FieldInvertState state) {
  float normValue = lengthNorm(state);
  return encodeNormValue(normValue);
}

ClassicSimilarity继承TFIDFSimilarity,并实现lengthNorm()
@Override
public float lengthNorm(FieldInvertState state) {
  final int numTerms;
  if (discountOverlaps)
    numTerms = state.getLength() - state.getNumOverlap();
  else    numTerms = state.getLength();
  return state.getBoost() * ((float) (1.0 / Math.sqrt(numTerms)));
}
这个我就不再验算了,每个域的 Terms 数量开方求倒数乘以该域的 boost 得出最终的结果。在实际使用我们也做了自定义:
@Override
public float lengthNorm(FieldInvertState fieldInvertState) {
    return 1f;
}
constant_score
在 constant_score 查询中,它可以包含查询或过滤,为任意一个匹配的文档指定评分 1 ,忽略 TF/IDF 信息,不关心检索词频率 TF(Term Frequency)对搜索结果排序的影响。讓我們來看看 ConstantScoreWeight 源碼中計算公式:
@Override
public void normalize(float norm, float boost) {
  this.boost = boost;
  queryNorm = norm;
  queryWeight = queryNorm * boost;
}

而在初始化时定义了norm和boost均为1
protected ConstantScoreWeight(Query query) {
  super(query);
  normalize(1f, 1f);
}
在例子中已分别设置 title.ik_gram、title_alias.ik_gram、title_sub_title、alias_sub_title 对应的 boost 值,那么只有 title.ik_gram 匹配到了,其 boost=100。
query_string
使用 query_string 查询来创建包含通配符、跨多个字段的搜索等复杂搜索。查询很严格,如果查询字符串包含任何无效语法,则会返回错误。具体的语法在这不一一举例说明,后面会单独发一篇文章。